Disclaimer: AWS Bedrock costs money, don't follow any of this tutorial without understanding the costs, and understanding that you will be the sole person paying those costs. Would you jump off a bridge if I told you to?
It's critically important for your company to have an AI enabled chatbot these days so that internal users and external users can easily access your company's vast store of knowledge in an convenient conversational fashion.
The folks over at Amazon Web Services have created a chatbot-as-a-service service called Amazon Bedrock, which allows you to point and click a few options to pick a model, upload a knowledge base, and tell your chatbot agent how to behave.
NOTE There's a great tutorial over at ensembleanalytics.io on how to use Amazon Bedrock which a much less sarcastic tone.
NodeJS for creating your Knowledge Base (KB)AWS Bedrock for configuring your modelAWS S3 for storing your KBAWS Lambda for hosting an API that your Slack bot callsSlack for the chat interfaceServerlessJS for deploying your APIAWS Bedrock provides a "RAG" service with a free (actually it's expensive) text vector knowledge base. You can read further into vectors and embeddings and everything, but the gist is you're going to setup a "Google Suggest" type database, which will be queried via chat messages, and the results will be fed into the chatbot.
So instead of your model consuming your entire knowledge base to generate a result (which will lower accuracy, and be expensive), it instead sees something akin to the the first results page on Google search. You'll actually be able to see this in action in the AWS Bedrock playground as the chatbot will return "citations" of which data it looked at when formulating a response.
Bedrock consumes any text based file in its raw format - .txt, .csv, .json, etc.
However, using structured formats (which robots usually like) will likely yield worse results. Your bot understands human language, it does perform structured queries.
The better approach is to convert your data into natural English statements (or Spanish, or French, or anything except Canadian… Canadian chatbots are wildly offensive).
So if your data is a CSV like:
| Car | Color | Wheels | Doors |
|---|---|---|---|
| Porche | Blue | 4 | 2 |
| Caravan | Silver | 4 | 3 |
| Trike | Black | 3 | 0 |
| Mack Truck | Rust | 18 | 2 |
Then you'd want to convert that to a file like:
A Porche has a blue color, has 4 wheels, and 2 doors
A Caravan has a silver color, has 4 wheels, and 3 doors
...
A Mack Truck has a rust color, has 18 wheels, and 3 doors
Amazon Bedrock is an AWS service that grants access to several LLM (and other) models, it can ingest your Knowledge base
The flow is:
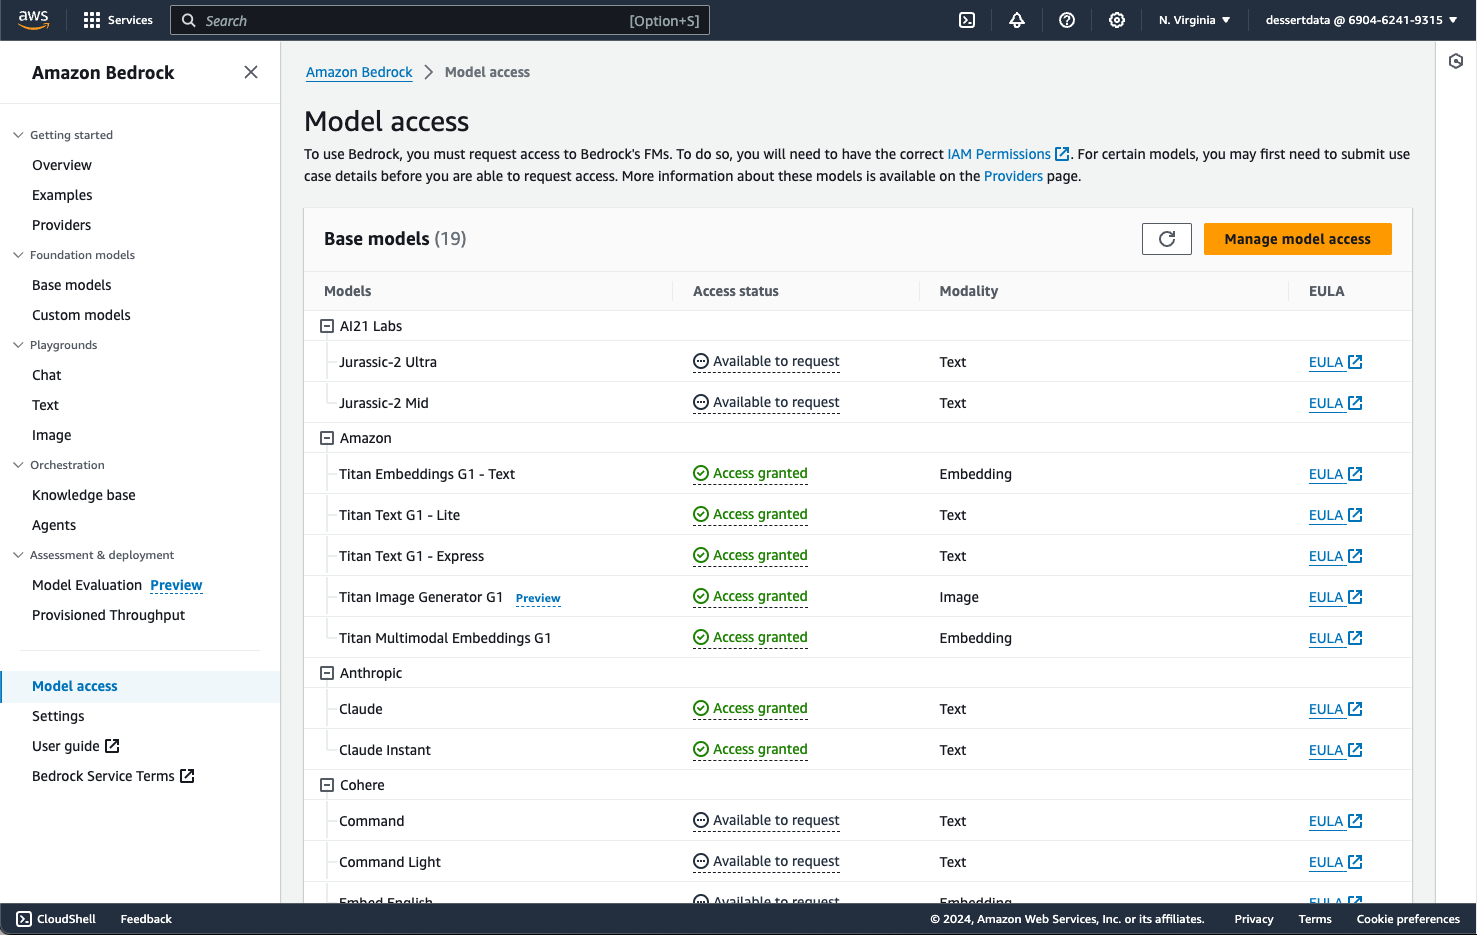
From your AWS console, open the AWS Bedrock service, then most of the way down the left hand nav bar you'll see a Model access option.
From there there's an orange "Manage Model Access" button which you can click, then check all of the models you want.
You may be tempted to over think this step and only select the models you really plan to use. Maybe comparing prices and use cases.
Don't over think it, just click everything, including Anthropic (quickly fill our your use case for Anthropic, they'll accept
anything), and move to the next step. You'll want to play with all of the different models as they all have fun different use cases.
Make sure read each EULA in it's entirety, and make sure you have your lawyer on the line as well. Your lawyer may have you red line some of the terms, so probably get legal from Amazon and it's subsidiaries involved as well. Then make sure to print and store the legally binding contract that you've just signed, and check back on a daily cadence in case they've quietly made any changes to the EULA, in which case call your lawyer again and reprint.
Then click save and you'll have access within a few minutes.
While your waiting for model access, head over to S3, create a bucket and upload all of the files you want to be in your knowledge base.
In AWS Bedrock, on the left hand nav panel, click the Knowledge Base link.
Create Knowledge Base buttonCars knowledge baseNextCars natural EnglishQuick create a new vector store - RecommendedCreate knowledge baseNow fix any permissions required and try again. Then realize you can't use the root account and try again.
(The "try again" last step should have been earlier in this post, but if you're smart you would have skimmed the whole post first before recklessly clicking things.)
Note you can't do this as an AWS root user, Amazon will only tell you this after you've failed about 15 times.
{
    "Version": "2012-10-17",
    "Statement": [
        {
            "Sid": "VisualEditor0",
            "Effect": "Allow",
            "Action": "aoss:*",
            "Resource": "*"
        }
    ]
}
Once you've got your permissions correct, and you click Create knowledge base, then you'll see a blue spinner
at the top of your page. This takes about 10 minutes (this is where you're incurring fees).
DON'T CLOSE THE PAGE
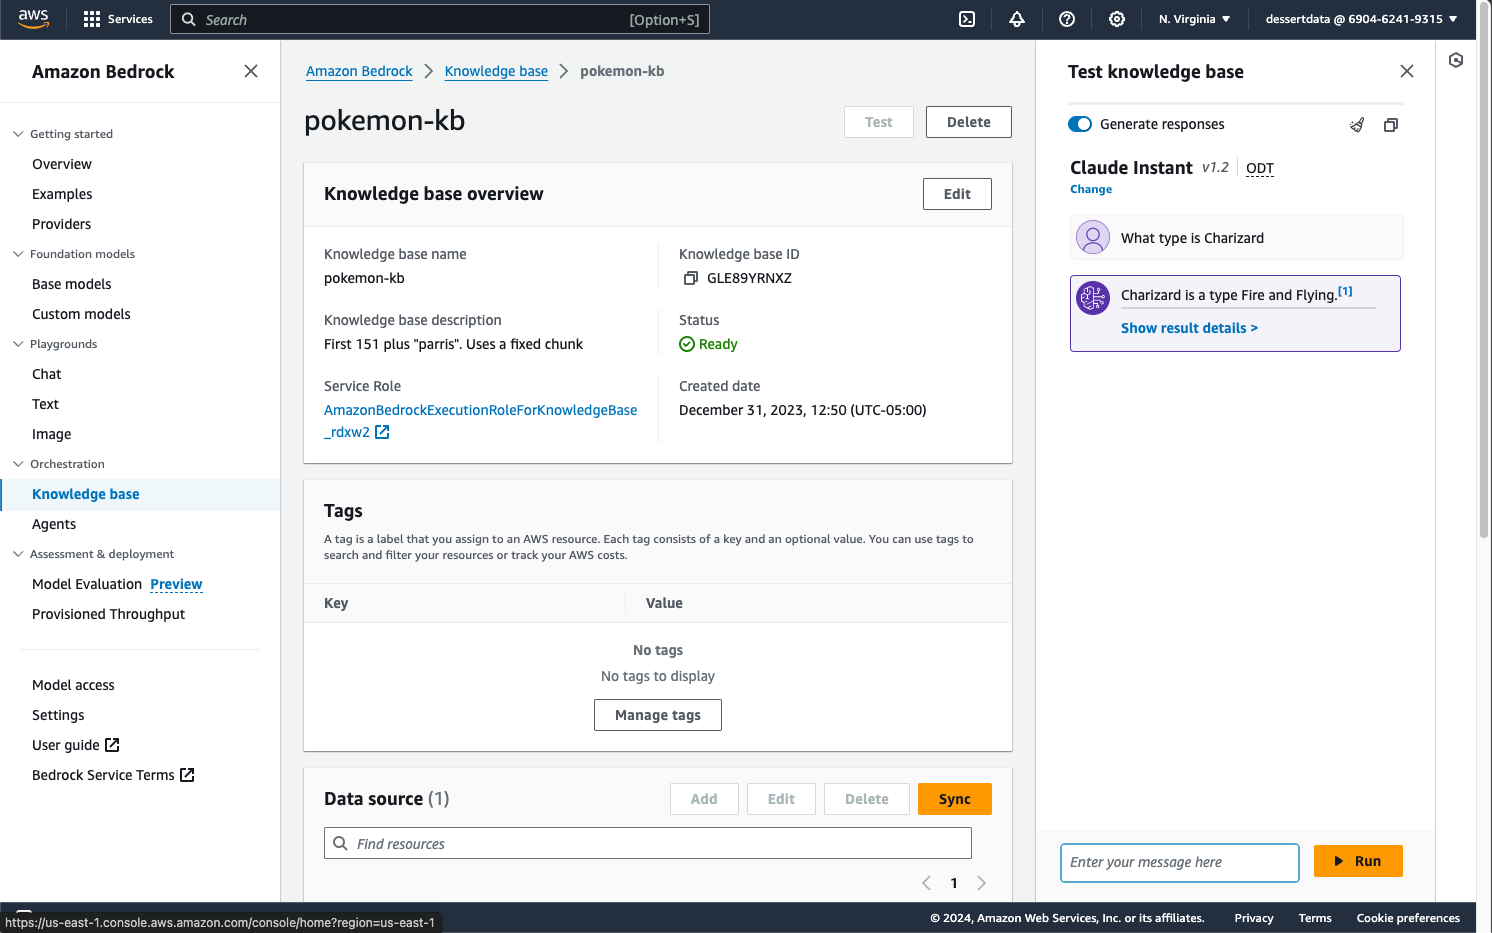
Once the blue spinner is done, you'll get this weird UX where a green alert bar pops up with a "sync now" button. Click that button and it'll spin a little longer, then you're ready to move onto the fun part.
A "Test knowledge base" button will appear where you can ask the AI questions. Try picking a model and asking it things relevant to your knowledge base.
This is where you can give your chatbot a little sass. Click on the orange "Agents" link on the left hand nav bar, "create agent", then play around.
I thought the Knowledge Base responses were fine, so I basically just repeated that config, but it would be baller to have an agent that behaves like a drunk sailor.
This is where you're going to understand how to code, at least a little. You will need an API that can receive a Slack message, pass it to your drunk sailor agent, then send a message back to Slack.
If you're using AWS API Gateway, then your API will have a max 30 second timeout, so you'll have to pass the API to another type of endpoint (SNS), then have that new process send a Slack message back.

An easy way to set this whole affair up is using serverlessJs.
Have NodeJs and npm installed (yarn if you buy vinyl)
Create an SNS topic for receiving chat messages, note the ARN
Install all your Node libraries
yarn add serverless aws-sdk @slack/web-api
Create a serverless.yml file
service: fancy-chatbot
provider:
    name: aws
    runtime: nodejs20.x
    stage: ${opt:stage, 'preview'}
    region: us-east-1
    logRetentionInDays: 14
    iam:
        role:
        statements:
            - Effect: 'Allow'
            Resource: '*'
            Action:
                - 'bedrock:InvokeModel'
                - 'bedrock:InvokeAgent'
                - 'bedrock:RetrieveAndGenerate'
                - 'bedrock:Retrieve'
                - 'bedrock:ListFoundationModels'
                - 'SNS:Publish'
functions:
    slack:
        handler: lambda.receiveChatHttp
        timeout: 30
        events:
        - http:
            path: bot
            method: post
    agent:
        handler: lambda.receiveChat
        timeout: 600
        events:
        - sns: arn:aws:sns:us-east-1:8675309:fancy-chat-bot
Create a JS handler (note - a lot of naughty path code removed for brevity)
const agent = require('./query-agent.js')
const AWS = require('aws-sdk')
const { WebClient } = require('@slack/web-api')
const slack = new WebClient(process.env.SLACK_TOKEN)

/**
* Receive HTTP chat message
*/
const receiveChatHttp = async function(event) {
    // Parse request
    const body = JSON.parse(event.body)// Slack requires this
if (body.challenge) {
    return {
        statusCode: 200,
        headers: { 'Content-Type': 'text/plain' },
        body: body.challenge
    };
}

const sns = new AWS.SNS({ apiVersion: '2010-03-31' })
await sns.publish({
    Message: event.body,
    TopicArn: '{ YOUR SNS TOPIC ARN }',
}).promise()

return {
    statusCode: 200,
    body: "{message: 'Success'}",
}
}

/**
* Lambda handler to receive a chat
*/
const receiveChat = async (event) => {
    // Handle each event
    for (const record of event.Records) {
        const body = JSON.parse(record.Sns.Message)
        const response = await agent(body.event.text)    const { channel } = body.event
    await slack.chat.postMessage({ channel, text: response.output.text })
}
}

module.exports = { receiveChat, receiveChatHttp }
A JS file for calling your Agent (again, brevity)
const aws = require('aws-sdk')
const agent = new aws.BedrockAgentRuntime()

const go = async (query) => {
    const params = {
        input: {
            text: query
        },
        retrieveAndGenerateConfiguration: {
            type: "KNOWLEDGE_BASE",
            knowledgeBaseConfiguration: {
                knowledgeBaseId: '{ YOUR KB ID}',
                modelArn: 'arn:aws:bedrock:us-east-1::foundation-model/anthropic.claude-v2:1' // Claude 2.1's ARN
            }
        },
    }// Call Bedrock Agent
try {
    return agent.retrieveAndGenerate(params).promise()
} catch (e) {
    console.error(e)
}
}

module.exports = go
Deploy yarn serverless deploy
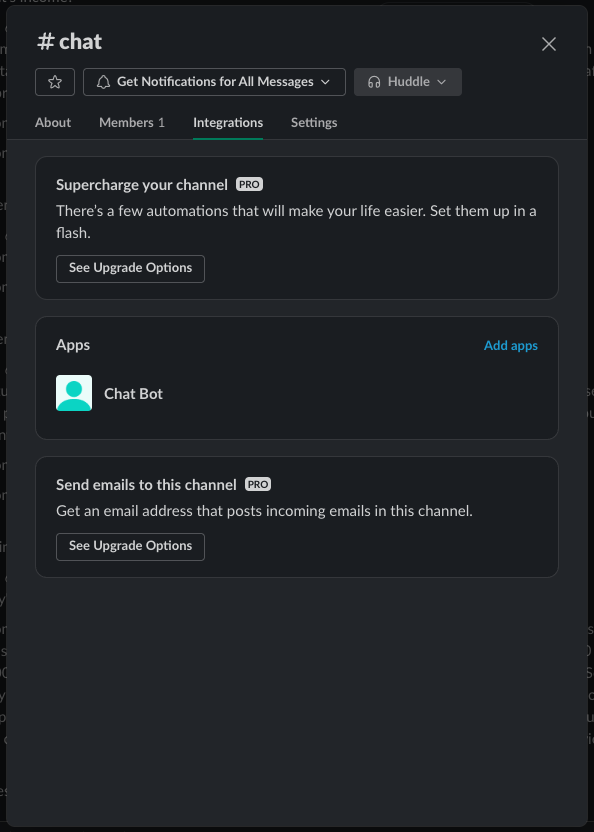
Create a basic Slack bot using Slack's pointy clicky service.

OAuth & Permissionschannels:history, channels:join, chat:write, metadata.message:readgroups:historyapp_mentions:readEvent Subscriptions so your bot will receive your chat messagesEvent Subscriptions on the left nav panelEnable Events toggleyarn serverless deploy into the "Requested URL" fieldSubscribe to bot eventsmessage.channels and message.groupsInstall App on the left nav panelBot User OAuth Token, add it as an environment variable in your API: process.env.SLACK_TOKENNow go to Slack, create a channel, add your bot, and ask it all sorts of vague questions about your knowledge base.
If it doesn't work the first time (be very suspicious if it does), then add some logging into your Javascript
files above, redeploy using yarn serverless deploy, and check the logs in AWS Cloudwatch.
Some of the issues I found while tinkering around
This ended up happening because I didn't have proper scopes setup in Slack pointy clicky service.
You just recklessly copy pasted the provided Javascript. Make sure everything is working in your environment.
Did you copy your oauth token into your environment in your Lambda? Try logging process.env.
Likely an IAM permissions issue. Roll up your sleeves this is going to be a long fight.